Create To Communicate
LESSON 4
LIFE AND FAMILY
My Family Tree
Objective: Students will introduce a classmate’s family using personal and possessive pronouns and will create a family tree using mixed media.
Level: High Beginner
Materials: Paper, pencils, scissors, and glue. Optional materials depend on which option you choose for Part One, Step Four: photographs of family members, old magazines, tempera paint, paint brushes, containers for water, and crayons.
Teacher Preparation: Look at the various options for making a family tree in Part One, Step Four. Choose an option suitable for your class depending on the materials you have available. Prepare materials for the activity ahead of time if needed.
Art Options: Many different materials can be used for this activity. The activity instructions list various options that utilize a combination of drawing, painting, collage, or printmaking techniques. However, this activity may also be completed solely as a drawing, painting, printmaking, or painting activity, depending on the materials available.
INSTRUCTIONS
Part One: Family Tree Artwork
- Discuss with students what a family tree is. A family tree is a chart that shows the relationship of family members in tree structure.
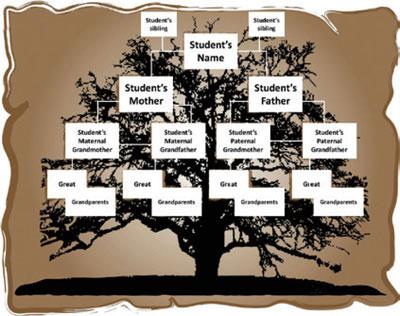
- (Optional) Make a family tree to show students as an example, or show students the template provided in this activity.
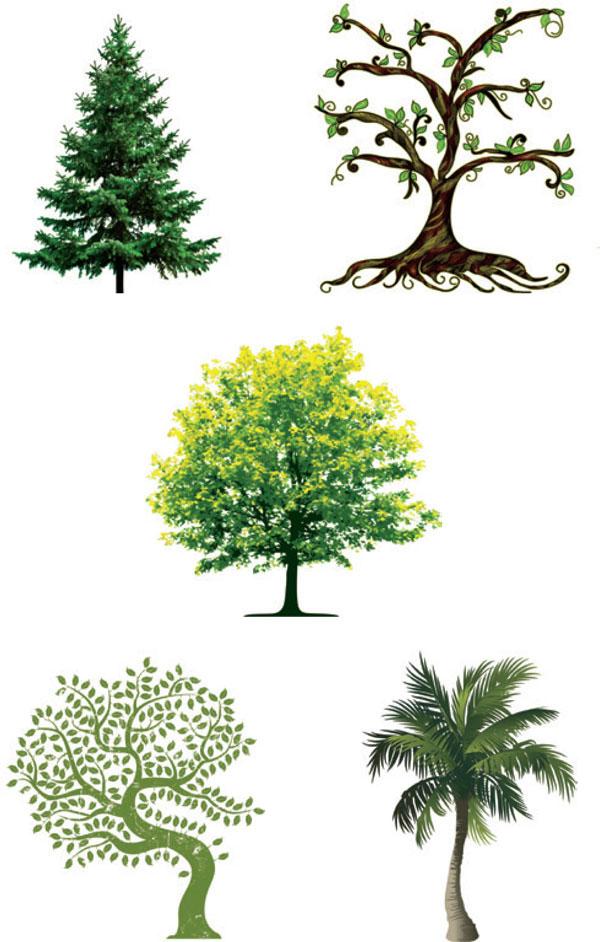
- If needed, introduce or review tree vocabulary words (see below). Add more words if desired and use the images on page 148 as visual aids.
tree
branch
forest
pine tree
limb
leaf/leaves
trunk
bark
root - Students first need to create a tree. There are many art options for creating a tree. Some suggestions are listed below. Feel free to combine, alter, or modify the suggestions to best suit the materials available as well as the age and needs of your students.
a. Draw a tree from observation. If possible, take students to an area outside of the classroom where they can directly observe trees. If paints or crayons are available, students can paint or color their tree when they are back in the classroom.b. Create a collage tree. Students can create a tree using collage by cutting out brown and green paper and gluing it together to create the trunk and leaves.c. Use printmaking to create a tree. Have students draw the outline of a tree first. Then, have students paint or color the tree trunk and branches brown. If using paint, let the tree trunk paintings dry. Next, have students cut leaf shapes out of old sponges or carve leaf shapes into hard vegetables, like potatoes. Tell students to lightly dip the sponge or vegetable stamp into green paint and then press the stamp onto the trunk and branches of their tree. Have students repeat dipping their stamp into paint and pressing it onto their papers until they have created the leaves for their tree. *TIP: Use various colors of green paint for the leaf prints. Refer to the color mixing section in Appendix A if needed.
- Have students put their artwork in a safe place for the paint or glue to dry.
Part Two: Family Tree Construction
- Show students the structure of a family tree. Draw a family tree chart on the board for students to copy, or use the template below, available in the Reproducible Worksheets section at the end of this lesson. Add extra boxes for brothers, sisters, aunts, or uncles as needed.
- Tell students to research the names for their family tree artwork. Students may need to ask their parents the names of their grandparents, great-grandparents, aunts, uncles, or other extended family members. Younger students may not be able to provide much information about their extended family and may only be able to make a family tree of their immediate family.
- Once students have researched the names for their family tree, have students add names to their family tree artwork.
- Students can add names to their family trees several ways. Four options are listed below. Choose an option most appropriate for your class or allow students to choose an option they prefer.
a. Students can draw name boxes and write their family members’ names directly on their artwork.b. Students can write the names of family members on white paper boxes, cut the boxes out, and glue them in the correct place on the tree artwork.c. Students can bring in photos from home, cut the family member out of the photograph, and glue the photo in the correct position on the family tree. Make sure students then write the name of the family member under the photo.d. Students can create small drawings of their family members and glue them to the correct position on their family tree, writing the names of their family members below the drawings.
Part Three: Practice with Personal Pronouns, Memorization Game
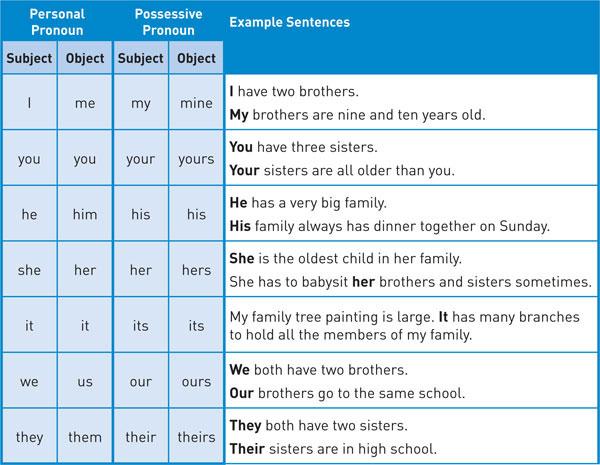
- Review or teach pronouns (a word that can substitute for or replace a noun) to students. If needed, use the chart below as a resource tool.
- Once students have a good understanding of personal pronouns, play a pronoun memorization game.
a. Have the class sit in a big circle, facing each other.b. One student starts by introducing himself or herself, and then saying something about his or her family. For example: “My name is Amira. I have three brothers.”c. The next student in the group then introduces himself or herself and says something about his or her family. The second student also has to repeat what was said by the previous student in the circle, changing the personal pronouns. For example: “My name is Tim. I am an only child. This is Amira. She has three brothers.”d. The game keeps going around the circle, getting harder each time because more information is added and has to be repeated with the correct personal pronoun.
Part Four: Family Introductions
- After reviewing personal and possessive pronouns in the circle memorization game, have students find a partner. Tell students to choose somebody they do not usually work with.
- Choose one family tree picture to use as an example.
- Tape the student’s family tree picture on the board. Use the picture to model how to talk about what is depicted in the family tree artwork. For example, you might say:
She has a very big family.
She has three brothers and two sisters.
Her grandmother’s name is Mary.
Her grandfather has the same name as her father. - Have students look at their partner’s family tree picture. Tell students to ask questions about their partner’s family tree and practice introducing their partner and his or her family. Remind students to use personal or possessive pronouns.
- Encourage students to ask questions about the family that is being introduced (specifically questions that require the use of personal or possessive pronouns in the answer). For example, ask questions like:
What does your brother like to do?
Possible answer: He likes to play soccer.
What is your favorite thing about your grandmother?
Possible answer: She is a good cook. - Have students listen and keep a tally of the similarities among students’ families. After each student’s family has been introduced, students could then report their findings. For example: Ten people in our class have a brother. Two people in our class have great-grandparents.
Part Five: Exit Ticket Closing Activity
- To review personal pronouns, have students line up at the end of class. Show them a picture of a boy, girl, or animal, or point at yourself or them, and have them indicate which personal pronoun would be used. They can leave when they say the correct pronoun.
Extension Activities:
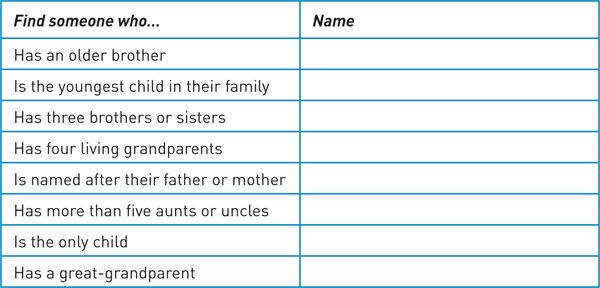
Find Someone Who…
Play the Find Someone Who game! Make worksheets with the chart below. To play the game students have to move around the classroom and practice English by turning the statements on the worksheet into questions and asking other students the questions. The first statement, Has an older brother, would be turned into the question Do you have an older brother? When a student finds someone who can answer yes to the question, he or she should write that student’s name next to the statement.
Family Timeline
For higher level students, have students interview their family members about major events in their immediate and extended family’s history. Students should record events as far back in the past as they can. Students can then write a timeline of their family history, using the past tense. If desired, students can also draw pictures or use collage to incorporate images into the timeline. Below is an example:

If possible, have students compare events that took place in their families and find out what happened in their families around the same time.
Interview a Relative
Have students interview a relative in their family to find out more about their life history. Students can compile a list of questions together in class, such as:
When were you born?
Who were your friends in school?
What were your hobbies when you were a child?
What type of music did you like?
Who were your friends in school?
What were your hobbies when you were a child?
What type of music did you like?
Have students take notes when they interview their relative and then report their findings about their relative to the class.
Additional Resources:
A website for building family trees is available through Family Tree Magazine.
http://kids.familytreemagazine.com/kids/default.asp
http://kids.familytreemagazine.com/kids/default.asp
USA.gov has many resources for genealogy.
http://www.usa.gov/Citizen/Topics/History-Family.shtml
http://www.usa.gov/Citizen/Topics/History-Family.shtml
Family tree templates can be found here.
http://www.familytreetemplates.net/
http://www.familytreetemplates.net/
TREES
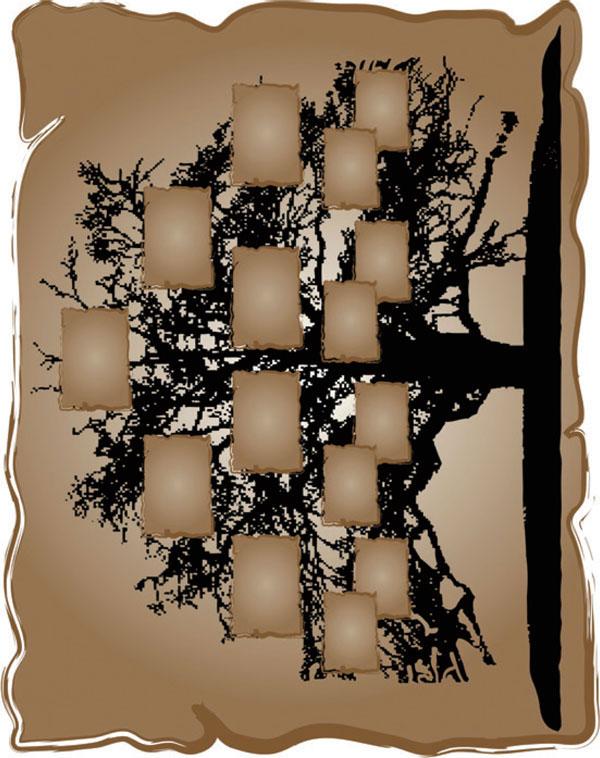
MY FAMILY TREE
Directions: Complete the family tree below.